Whether you’re prepping for a quick snack, crafting a high-protein lunch, or building a low-carb recipe for your weekly meal prep, hard-boiled eggs are a staple in most health-conscious kitchens. They’re affordable, packed with nutrients, and incredibly versatile. But if you’ve ever cracked one open only to see an unappealing green ring around the yolk, you’ve probably wondered: Is it safe to eat? Did I mess up somewhere?
The good news? Yes, it’s safe—and no, you didn’t ruin the egg. But with a few small adjustments, you can prevent that discoloration and enjoy picture-perfect eggs every time.
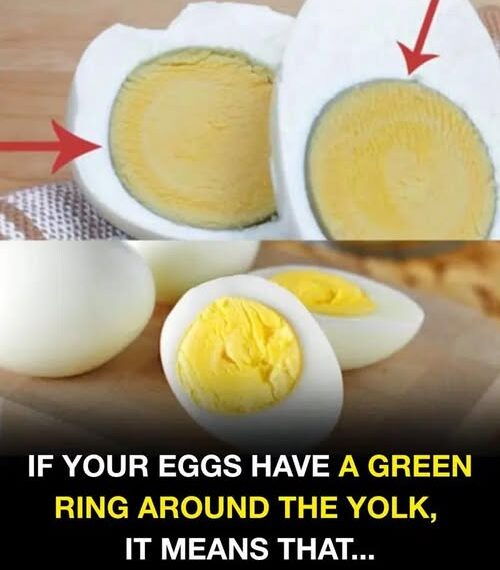
🧪 What Causes the Green Ring in Hard-Boiled Eggs?
The green-gray ring that sometimes forms around the yolk is due to a natural chemical reaction that occurs when eggs are overcooked. When subjected to high heat for too long, sulfur in the egg white reacts with iron in the yolk, forming iron sulfide. This compound is completely harmless but visually off-putting—especially if you’re preparing healthy snack options or keto-friendly meals for guests or social media posts.
Understanding the science helps us avoid the mistake. It’s not about egg quality—it’s all about technique.
✅ How to Boil Eggs Without the Green Ring (The Right Way)
Perfecting the hard-boiled egg isn’t rocket science, but it is food science. Here’s how to consistently get bright yellow yolks and a soft, creamy texture.
1. ⏲️ Perfect the Timing
Overcooking is the #1 reason for that greenish hue. Instead of boiling your eggs into oblivion, try this foolproof method:
-
Place cold eggs in a saucepan and cover them with cold water by about an inch.
-
Bring the water to a gentle boil, then immediately reduce the heat to a low simmer.
-
Cook for 9 to 12 minutes, depending on your preferred yolk firmness.
This method not only prevents the green ring but also yields a better texture—ideal for protein-rich diets or weight loss meal plans where texture matters.
💡 Bonus tip: Set a timer. Timing is everything when it comes to egg perfection.
2. 🧊 Use an Ice Bath to Stop the Cooking
As soon as the cooking time is up, plunge the eggs into an ice water bath for at least 5 to 10 minutes. This does two things:
-
Stops the cooking process immediately, preventing further heat from causing discoloration.
-
Makes peeling easier, especially with older eggs.
This technique is especially important if you’re planning a big batch for easy meal prep ideas or on-the-go breakfast options.
3. 🥚 Choose Slightly Older Eggs
Yes, older is better—at least when it comes to boiling eggs. Fresh eggs tend to be harder to peel because the membrane is tightly attached to the shell. Eggs that are 7 to 10 days old are ideal for boiling, offering a cleaner peel and less frustration.
This small trick can save you time and stress when preparing food for your low-cholesterol diet or diabetic-friendly meals.
4. ❄️ Store Them Right
Proper storage is essential for food safety and taste:
-
Keep unpeeled hard-boiled eggs in the refrigerator in an airtight container for up to one week.
-
If you’ve already peeled them, store in a sealed container with a damp paper towel and consume within 2 to 3 days.
Not only does this preserve freshness and texture, but it also keeps your meal prep for weight loss safe and delicious throughout the week.
5. 🍽️ Remember That Presentation Matters
Even though the green ring is harmless, let’s face it—a clean, golden yolk just looks better. Whether you’re using hard-boiled eggs in avocado egg salad, low-carb snacks, or cholesterol-lowering meals, appearance can make a difference in how much we enjoy our food.
Use perfect eggs to impress guests, boost your Instagram-worthy meals, or simply feel better about eating healthy.
🥗 Health Benefits of Hard-Boiled Eggs
continue reading in page 2