Fresh home-grown garlic has a flavor and aroma that no store-bought bulb can match. The good news? You can easily root garlic at home and create an endless supply year after year – without needing a large garden.
Whether you’re regrowing garlic from a store bulb or starting from seed garlic, the key lies in getting fast, strong root growth before planting.
With this simple rooting trick, you can grow garlic almost anywhere – pots, containers, raised beds, or even water jars on your kitchen windowsill.
Why Root Garlic Before Planting?
Most gardeners plant garlic cloves directly into soil, but pre-rooting them gives a big advantage.
Benefits of rooting garlic first:
- Faster sprouting: Pre-rooted cloves establish growth almost immediately after planting.
- Higher success rate: Reduces the risk of rot or failed bulbs.
- Longer growing season: Especially useful in cooler climates.
- Stronger roots: Leads to larger, healthier bulbs at harvest.
By giving your cloves a head start, you essentially “wake them up” before they ever touch soil.

Step 1 – Choose the Right Garlic
Not all garlic is the same. There are two main types:
Hardneck Garlic (Allium sativum var. ophioscorodon)
- Thrives in cooler climates.
- Produces a central flowering stalk (scape).
- Strong flavor and large cloves.
Softneck Garlic (Allium sativum var. sativum)
- Ideal for warmer regions.
- Longer storage life.
- More cloves per bulb but smaller in size.
For fast rooting and indoor growing, softneck varieties are usually the easiest to handle, while hardneck types do well in outdoor beds for bigger bulbs.
Tip: Choose firm, healthy bulbs with no mold or soft spots. Organic or locally grown garlic roots best, as supermarket bulbs are sometimes treated to prevent sprouting.
Step 2 – Separate and Select the Best Cloves
Break apart the bulb carefully without damaging the base of each clove. Select the largest outer cloves, as they contain the most stored energy.
Smaller inner cloves can still grow but produce smaller bulbs.
Do not peel off the papery skin – it protects the clove during the rooting stage.
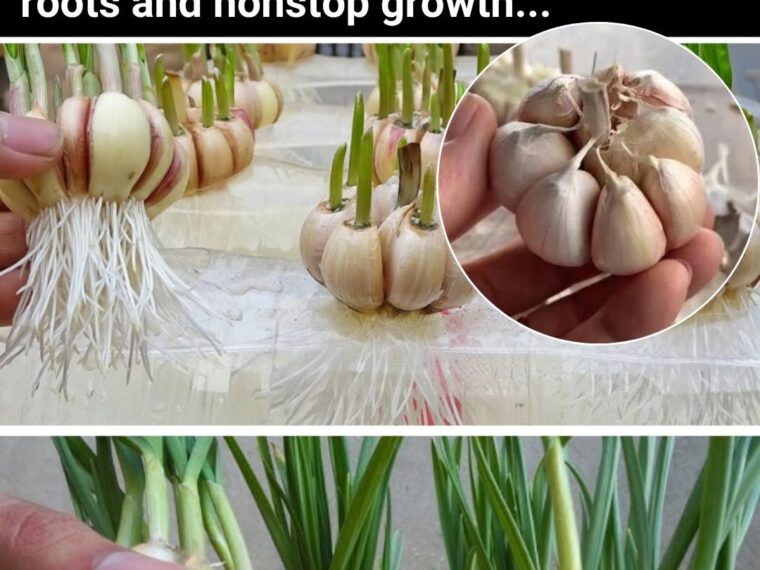
Step 3 – The Secret Trick: Pre-Rooting Garlic in Water
This simple step dramatically speeds up rooting and ensures every clove takes off quickly.
You’ll need:
- A glass jar or shallow dish.
- A small piece of mesh, toothpicks, or paper towel.
- Room-temperature water (filtered if possible).
How to do it:
- Fill the jar with about 1 inch of water.
- Place a mesh or paper towel over the opening.
- Set the cloves upright so the base (flat end) just touches the water, with the pointed tip facing up.
- Keep the jar in a bright, warm spot out of direct sunlight.
Within 3–7 days, you’ll notice white roots emerging from the base, followed by green shoots at the top.
Change the water every 2 days to keep it fresh and prevent mold.
This hydro-rooting trick “activates” your garlic much faster than planting it directly into cold soil.
Step 4 – Transfer the Rooted Cloves into Soil
Once roots reach about 1 inch long and shoots appear, it’s time to plant your pre-rooted cloves.
Choose a container:
- At least 8–10 inches deep with drainage holes.
- Use well-draining soil – a mix of compost, garden soil, and coarse sand or perlite works perfectly.
Planting method:
- Make holes about 2 inches deep and 4–6 inches apart.
- Gently place the rooted cloves, roots down and shoots up.
- Cover lightly with soil and water thoroughly.
Keep the soil consistently moist but not soggy. Garlic dislikes standing water.
If planting outdoors, ensure the spot gets at least 6 hours of sunlight daily. Indoors, place the pot near a bright window or under a grow light.
Step 5 – Encourage Strong Growth
Once your rooted cloves are established in soil, garlic needs only moderate attention.
Light: Full sun (6–8 hours daily).
Water: About once or twice a week – let the top 2 inches of soil dry before watering again.
Fertilizer: Every 4–5 weeks, feed with compost tea or an organic balanced fertilizer (5-5-5).
For lush green tops, a little nitrogen early on helps, but reduce it once bulbs start to swell beneath the surface.
Step 6 – Harvesting Garlic Greens for Continuous Supply
Here’s the real secret to having an unlimited garlic supply: Instead of waiting months for full bulbs, harvest garlic greens continuously!
When shoots reach about 8 inches tall, cut the upper third of each leaf. These fresh greens taste just like mild garlic and can replace scallions or chives in recipes.
Leave the base and roots intact – new shoots will regrow within a week or two.
By rotating a few containers and harvesting greens regularly, you’ll have a steady flow of fresh garlic flavor all year long.
Step 7 – Growing Garlic to Full Bulb Maturity
If you want full bulbs instead of greens, let the plants continue growing undisturbed.
Signs garlic bulbs are maturing:
- Lower leaves start yellowing (top leaves remain green).
- Soil around the base begins to crack slightly.
- The plant stops producing new shoots.
When about ⅔ of the leaves have turned yellow, it’s time to harvest.
Gently lift the bulbs with your hands or a small trowel – avoid pulling by the stems. Brush off excess soil and let them cure in a warm, airy place for 10–14 days.
After curing, store bulbs in a cool, dry spot. Properly cured garlic keeps for 6 months or more.
Step 8 – Regrow Again from Your Best Bulbs
Once you’ve harvested and cured your garlic, save a few of the biggest bulbs for your next round of planting.
Each clove from these will root even faster than store-bought ones because they’ve already adapted to your soil and climate.
Repeat the same rooting-in-water method and you’ll soon have another crop ready to plant.
With this simple cycle, you’ll never need to buy garlic again!

Tips for Growing Garlic Indoors Year-Round
- Use deep containers: At least 10 inches to allow root expansion.
- Rotate pots: Keep one batch growing while another is rooting.
- Use LED grow lights: 12–14 hours of light daily encourages strong greens.
- Avoid overwatering: Water only when soil feels dry 1 inch deep.
- Trim greens regularly: Encourages continual regrowth.
Common Garlic Rooting Problems & Fixes
continue reading in page 2