Have you ever walked through an old village or seen a rustic garden and noticed those charming woven fences or beds that seem to grow right out of the earth itself?
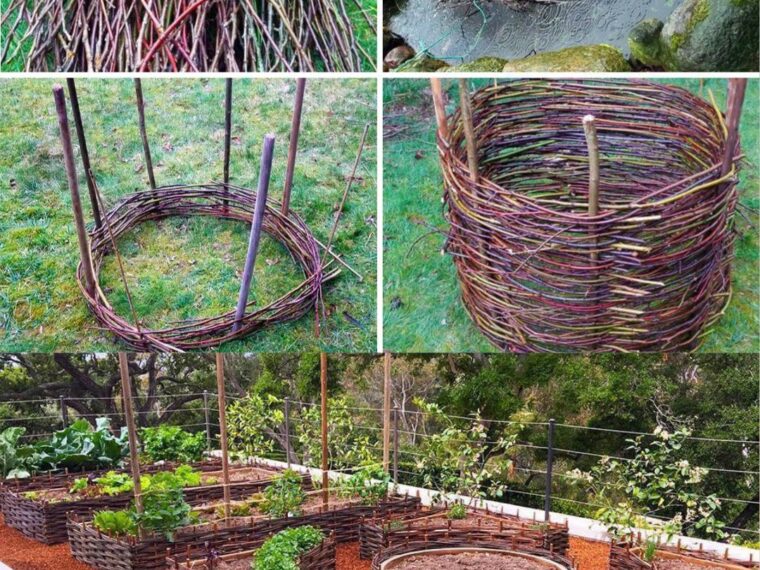
That’s the art of wattle weaving — a technique passed down through generations, used for centuries to build everything from fences and garden beds to walls and even homes.
Today, we’re bringing that timeless skill back to life — and putting it right in your backyard.
Whether you dream of a more natural-looking garden, want to build something sustainable, or simply love crafting with your hands, a wattle raised bed is the perfect DIY project to start with. Not only is it functional, it’s also deeply satisfying and a true work of living art.
🌱 What Is Wattle Weaving?
Wattle weaving involves intertwining long, flexible branches — usually willow or hazel — around vertical stakes to form a strong, breathable wall. This ancient method doesn’t just look beautiful. It also:
-
🌿 Naturally aerates the soil
-
🌞 Blends seamlessly into the garden
-
🌱 Creates a microclimate ideal for herbs, flowers, and vegetables
-
🧤 Uses 100% biodegradable, renewable materials
If you’re drawn to projects that connect you to the rhythms of nature and celebrate craftsmanship, keep reading.
🛠 Materials You’ll Need
Gather these before you begin:
-
Long, flexible branches (hazel or willow are best)
-
Thick stakes (about 2 feet longer than your desired bed height)
-
A hammer or mallet
-
Sharp pruning shears
-
Garden gloves
-
Measuring tape or string
-
Rich soil mixed with compost
💡 Tip: Freshly cut green branches are easier to bend and less likely to snap while weaving.
✏️ Step 1: Plan Your Bed
Think about what you want to plant. Herbs? Leafy greens? Flowers?
Choose a sunny location (most garden plants need at least 6 hours of sunlight) and sketch a rough outline of the bed. Oval, square, or even circular — wattle weaving adapts beautifully to many shapes.
Then mark the area using twine or chalk.
🧹 Step 2: Prep the Ground
Clear the area of weeds, roots, and debris. Use a rake to level the ground. This will ensure a solid base and prevent wobbling.
🪵 Step 3: Gather and Cut Your Materials
This is where you connect with nature.
Wander through a local woodland (with permission) or your own yard. Cut flexible branches — ideally around the thickness of your finger. If they feel too stiff, soak them in water for a few hours.
Cut your upright stakes — they’ll serve as the frame — to a length about 2 feet taller than the bed’s final height.
In Page 2, we’ll build the structure together — step-by-step weaving instructions, filling your bed, planting, and essential care tips to make your creation last for years. 🌼🧺